
Aenomaly SwitchGrade
Introduction
This review is pasted from my old website, you can read this or watch the youtube video at the bottom of this page.

What is it? The SwitchGrade is a machined block of aluminium that allows changing the angle of your saddle with the pull of a lever. It offers you three different saddle angles in a tool-free split second. The three angles are aimed toward riding uphill, on the flat and downhill.
Why would you want it? Depending on the type of riding you do a different seat angle can help. The three main categories are Trail, Downhill and Enduro:
Trail Riding. This includes any type of riding including XC, gravel and road riding where you ride on average on a level gradient. Here a flat saddle angle will suit you the best – your starting point should be flat, and you can adjust the pitch slightly from there for comfort. In this case, of course, there are ups and downs along the way, but on average you need a flat seat angle.
Downhill Riding. If you only ride the bike downhill in a bike park or shuttle riding (the uphill being on a lift) you want the saddle tilted backwards. This is for the following reasons:
1 – Tilting the saddle backwards will reduce the problem of the rear of the saddle getting in your way and banging around between your legs. Don’t get me started on silly sharp, or plastic-edged saddles…

Saddle designers, please never let this happen again. One day those sharp plastic edges are going to get rammed into your groin/abdomen area and it’s gonna hurt
2 – If you want to sit down when descending, now your saddle is pointed downhill (providing it was level to start with), if you sit down you will feel like you are sliding forward towards the front of the bike. Tilting the saddle backwards will stop you from sliding forward. This is helpful if you simply want to sit down when you’re tired, think big road connections in the Alps, you may be descending for miles and won’t want to stand up the whole time.
3 – It’s also helpful if you slip off the pedals, unclip, or need to adjust your feet during a descent. You can sit down comfortably and sort your feet position on the pedals.
What is the ideal angle here? It’s not super important as you won’t spend much time sitting down. So you want to hit a compromise between having the seat angle in line with your top tube for a sweet Instagram shot and a position where you can sit comfortably in a lift queue trying to look like a boss.
Purchase + Packaging

I ordered these SwitchGrades direct from Aenomaly in Canada, and they cost £170 plus shipping, £28, plus import duty and VAT adding £51 to the product. So not a cheap upgrade, but I think the price is fair for the product made in Canada
The packaging is simple and minimalist, and there’s this little tea bag type thing with the bolts and spares in. Now, I’m all for saving the environment, but Aenomaly has mentioned this as eco-packing, but these damn stickers are plastic! Of course, I’m nitpicking and joking, but plastic is bad, but we should consider how this block of alloy came to life and arrived on a plane to my house from Canada if we’re worried about that bit of plastic.

Installation
Dead. Easy. The instructions are easy to work out, and it took me around 15mins to fit the first time and double-check everything was correct. Doing it a second time would take less than 5 minutes. Plus, the Aenomaly website has all the info you could ever need about setup and technical details.
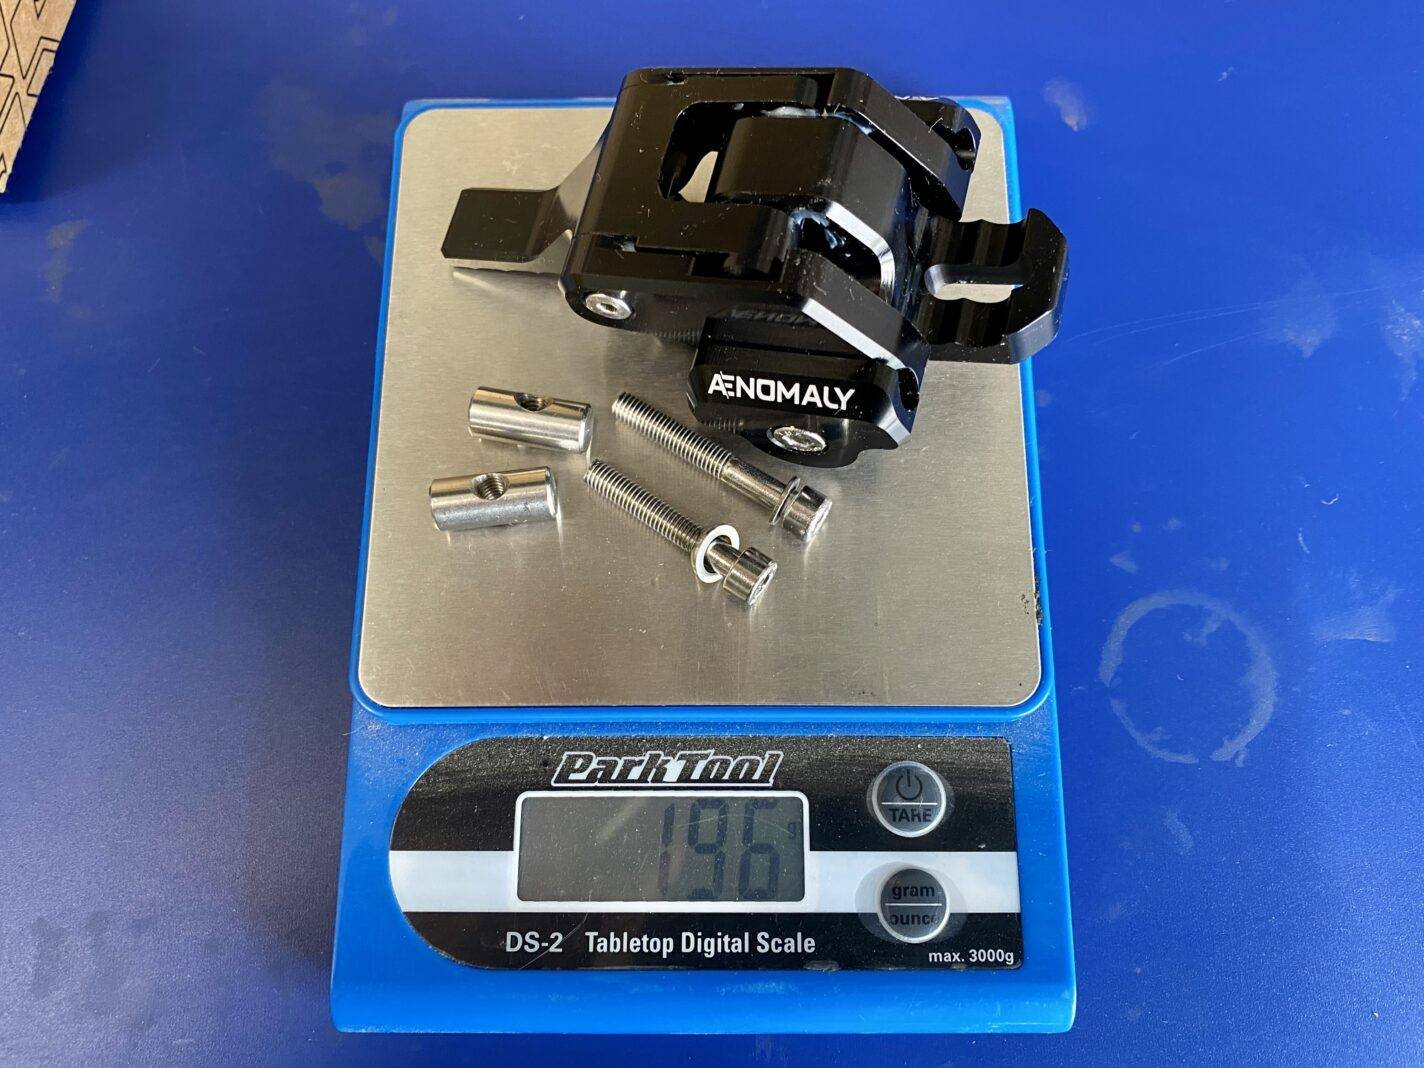
A tiny bit heavier than Aenomaly’s claimed weight of 170g, but there are a few different options, plus I saved 74g when replacing the existing Reverb parts. Plus, who cares, this should be a performance upgrade, not a weight saving.
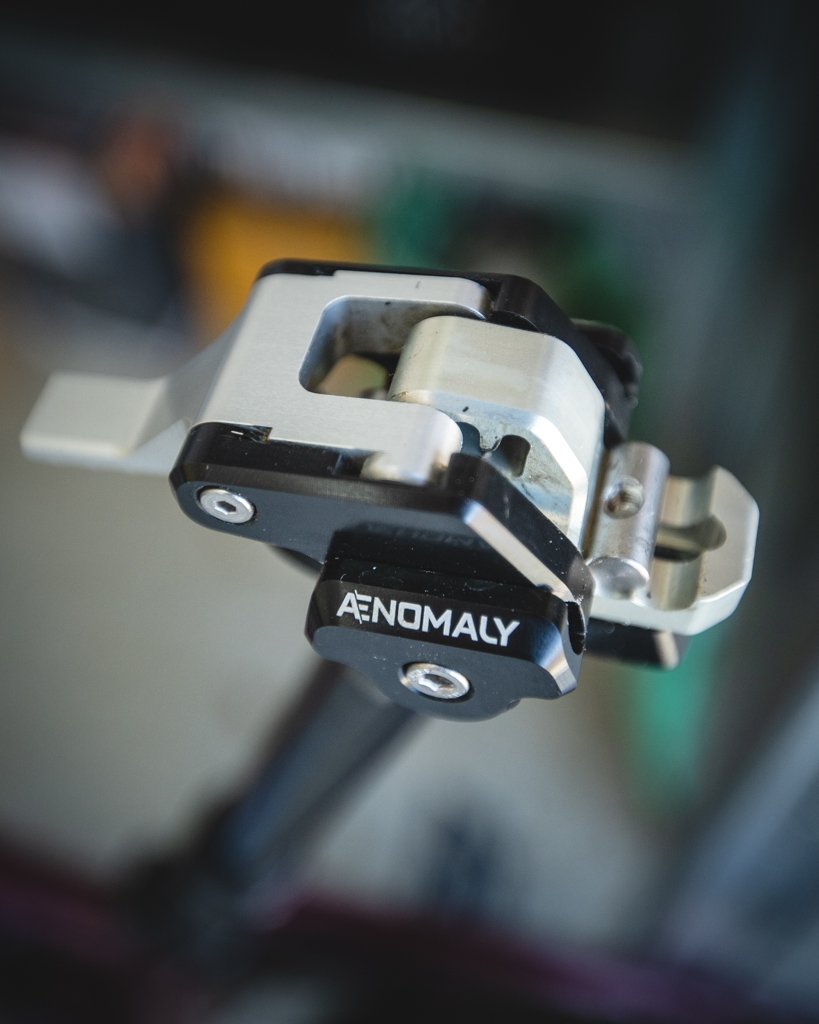
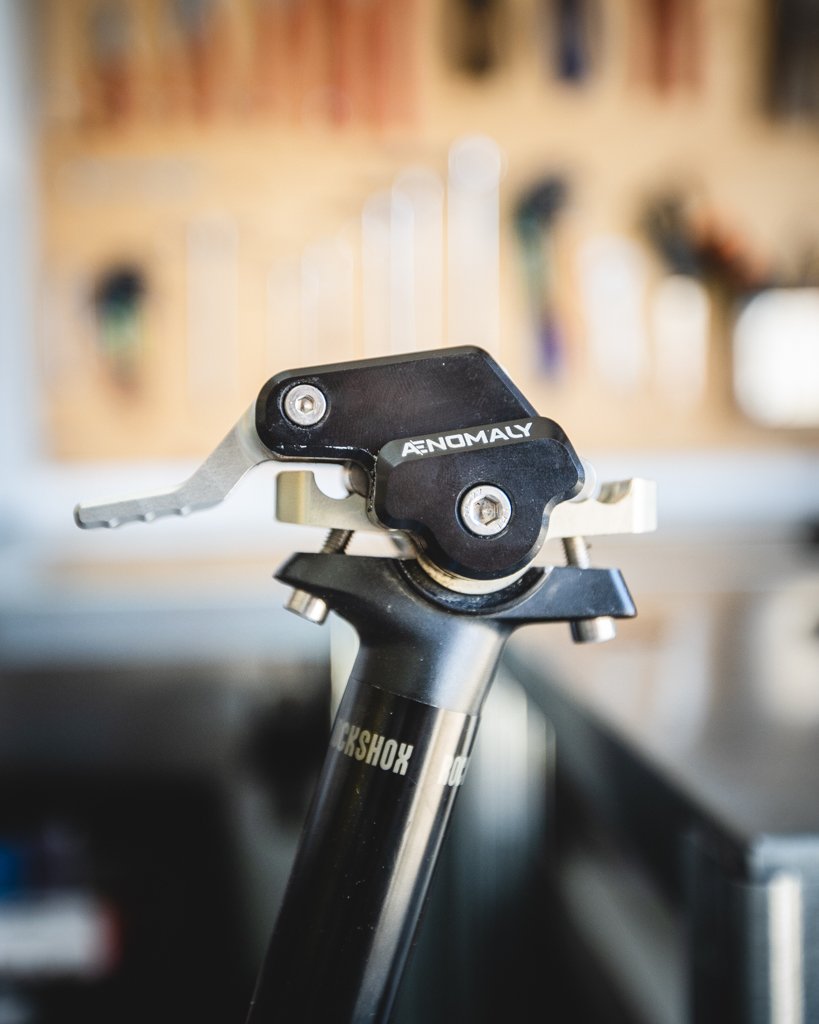
The seat clamp is nearly perfect, I have only seen this system on Shimano Pro posts in the past, I’m sure other brands have them too. Open the 4mm bolts and both sides of the clamp open, drop the saddle in and tighten it up. It’s actually easier than fitting a saddle normally to a post as it separates the two different functions of the clamp, it’s very simple and avoids the usual struggle against seat clamps and things falling off.

Great clamping system, nearly. Simply undo the 4mm on the left-hand side and both sides of the clamp open…
My only problem is that the main block of the SwitchGrade was slightly too wide to drop the saddle rails straight on top and into the clamp. So I had to undo the clamp completely, remove each side, fit the saddle, then put it back together and clamp it up. I think if the main unit was a few MM’s narrower it would slide straight on – I tried 3x different saddles which all had the same negative result.
Post filming thought: while making the video for this product I thought the head of the SwitchGrade might be deliberately too wide to allow some recessing for the saddle rails to fit snugly instead of against a flat inside surface

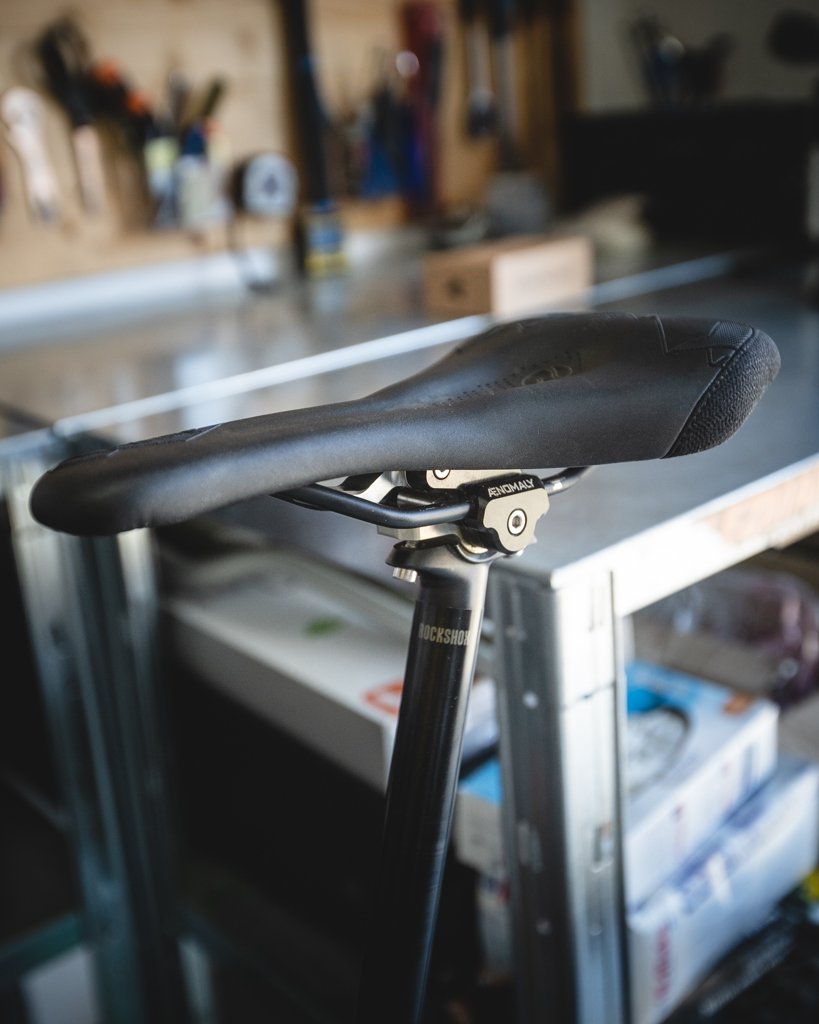
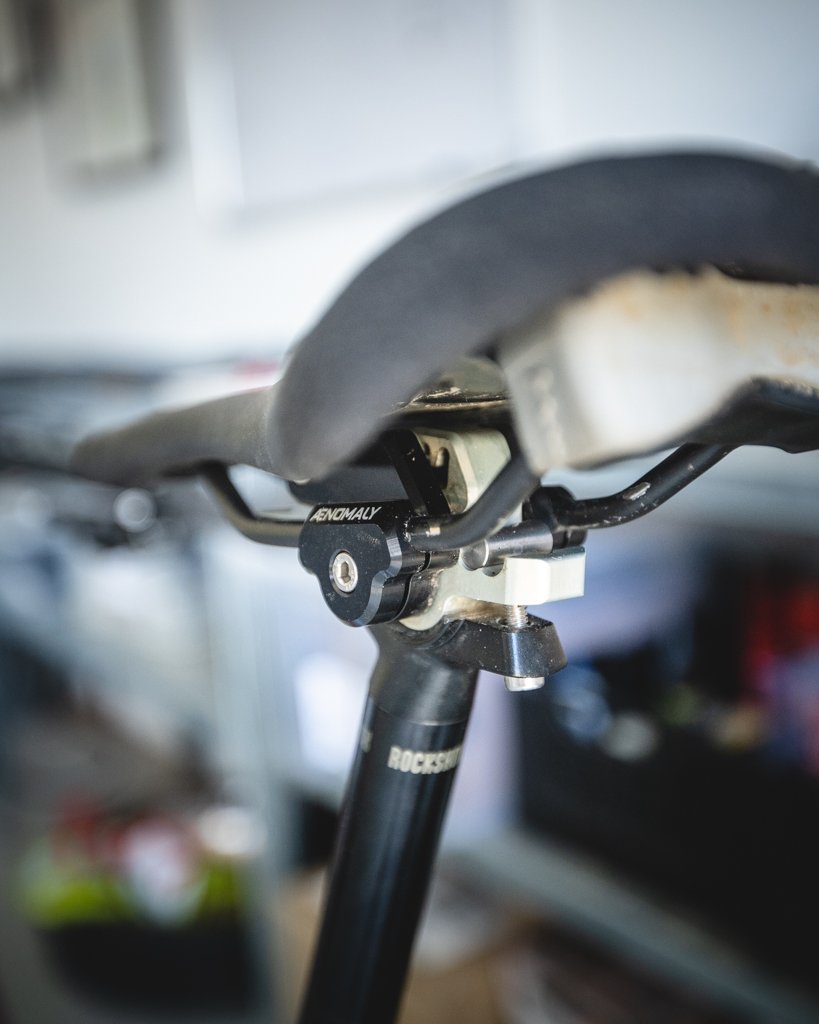
The clamp on the SwitchGrade clamps the saddle rails and allows adjustment backwards and forwards. The original seat clamp bolts that clamp the Switchgrade to the dropper post are used to adjust the angle.
Aenomaly suggests starting with the saddle flat in the middle position. I fully agree with this, then you can adjust the pitch slightly for your comfort and exact saddle shape. The middle position reflects the Trail position described above.
To change the angle, just grab the saddle and depress the lever underneath. It’s very easy and positive to tilt back and forth into the other two positions. forwards offers -10º change and rearwards -12º. Bear in mind the unit increases your saddle stack height 5-15mm depending on the version (there are 3x versions to suit different dropper posts), this is not an issue if you can further lower the total seat post height, but if your post is fully slammed in the seat tube this might make your saddle too high – measure carefully before ordering!
On the Trail
The Switchgrade does exactly what it is supposed to do. Top marks!
I found that I was only using two out of three positions depending on the riding I have done with it so far.
Enduro riding. Tilted forwards for the climbs, and neutral for the descents. I tried descend mode, but this can take you by surprise if you put the dropper up and sit down as then it feels really high and tilted back way too much. So I didn’t really use the descend mode that much for Enduro, but I have a 175mm dropper and the lower saddle height isn’t much of an issue for me.
Then Trail (yes, still on my unrideable, too heavy, single-pivot, 200mm travel bike) neutral angle was fine.
I’m sure Descend mode will be taken advantage of more when the bike parks open…
Do You Need the Switchgrade?
I have a few thoughts on this:
1 – If you think the reason you need this product is to tilt your saddle backwards and give you more space between your legs, I think you might be better off upgrading to a longer dropper to drop the saddle further out of the way. Considering the price of the SwitchGrade, you could buy a longer stroke dropper instead (providing you have enough space in your seat tube to accommodate a longer drop), I don’t want to be specific on prices as I know my followers are all over the world and prices vary. But let’s say you could buy a new, longer dropper from OneUp, for example, for a similar price.
2 – If you ride towards the DH side of the spectrum, you can simply adjust your saddle angle for pure DH days. Even if you use your bike for different types of riding, book in for a shuttle day on the weekend you can adjust it backwards for the DH day – a few minutes on the tools versus a few hundred quid not in your bank.
3 – If you fit the pure ‘Enduro’ category of rider explained here, or someone that rides one bike for many different things, then this can certainly be a worthwhile upgrade. I would definitely recommend it, though I didn’t end up using it as much as I thought. And with enough drop on my post, I don’t feel like I desperately need it.
Conclusion
The Aenomaly Switchgrade is a great piece of kit. Well made, solid, easy to use, well packaged and finished. It does help in many riding situations and I won’t be taking it off in a hurry, but also, it is not a product I could not live without.
Hopefully, I have provided enough information for you to make your own decision on if you need this for your type of riding and budget.
If you like this fully independent review, you can support further work and this entire project by buying competition tickets here.